<?xml version="1.0" encoding="UTF-8"?>
<!--Generated by Squarespace V5 Site Server v5.13.159 (http://www.squarespace.com) on Fri, 24 May 2013 01:44:43 GMT--><feed xmlns="http://www.w3.org/2005/Atom" xmlns:dc="http://purl.org/dc/elements/1.1/"><title>Deerfield Cellar Rat Blog</title><subtitle>Cellar Rat Blog</subtitle><id>http://deerfieldcellarrat.com/cellar-rat-blog/</id><link rel="alternate" type="application/xhtml+xml" href="http://deerfieldcellarrat.com/cellar-rat-blog/"/><link rel="self" type="application/atom+xml" href="http://deerfieldcellarrat.com/cellar-rat-blog/atom.xml"/><updated>2011-09-02T23:05:02Z</updated><generator uri="http://five.squarespace.com/" version="Squarespace V5 Site Server v5.13.159 (http://www.squarespace.com)">Squarespace</generator><entry><title>Global Warming? Not In Northern California Wine Country…</title><category term="climate change"/><category term="harvest"/><category term="viticulture"/><category term="weather"/><id>http://deerfieldcellarrat.com/cellar-rat-blog/2011/9/2/global-warming-not-in-northern-california-wine-country-1.html</id><link rel="alternate" type="text/html" href="http://deerfieldcellarrat.com/cellar-rat-blog/2011/9/2/global-warming-not-in-northern-california-wine-country-1.html"/><author><name>The Cellar Rat</name></author><published>2011-09-02T22:59:52Z</published><updated>2011-09-02T22:59:52Z</updated><content type="html" xml:lang="en-US"><![CDATA[<p>Controversy about climate change has swept the entire nation, with California wine country in tow. While record high temperatures have been searing cities across the country, Californians are complaining about another unseasonably cool summer. As these changes in temperature evolve into what seems to be a pattern, wine analysts and pundits are wondering if the esteemed growing regions of Northern California, like the Sonoma and Napa Valley, will be equally idyllic in the future. A report found in the journal, Environmental Research Letters, posited that as much as 50% of the North Coast and Central Coast growing regions would become unsuitable for winegrape production by the year 2039 due to higher temperatures. A myriad of publications including the L.A. Times, The Press Democrat and The Huffington Post wrote articles citing the report, prompting backlash from other journalists refuting the report&rsquo;s claims. Notable wineblogger Steve Heimoff pointed out <a href="http://www.steveheimoff.com/index.php/2011/08/17/more-inaccurate-herd-reporting-on-napa-climate-change/">in this article</a> that, in fact, this is the seventh year of cooling temperatures in Northern California. Deerfield&rsquo;s winemaker, Robert Rex, asserts that the warming temperatures in the middle of North America are drawing the cool marine air further inland, across California. The unprecedented amount of fog in the valley for this time of year is a good indicator that he&rsquo;s right. Global warming doesn&rsquo;t mean that every area on the planet is getting warmer &ndash; some places actually get colder as other places get hotter.</p>
<p>As the end of August approaches, the buzz in the Sonoma Valley continues to revolve around the unusually cool summer. The record amounts of late rainfall and low temperatures probably would be more shocking if the previous two harvests had been any different. The reality is that what seemed like an anomaly in 2009 has developed into a steady pattern. Both the &rsquo;09 and the &rsquo;10 harvest in Northern California were among the most challenging years that growers and producers have seen in decades. Both years bore the same hallmarks: Cold nights, few days above 80 degrees and heavy rainfall before most grapes were optimally ripe, which then brought mold and mildew. Top that off with some erratic one-day heat waves that burnt the sensitive, normally sun-tanned, grape skins and you&rsquo;ve got the Perfect Storm of poor growing conditions.</p>
<p><a href="http://deerfieldcellarrat.com/cellar-rat-blog/2010/7/8/the-myth-of-the-bad-vintage.html">I&rsquo;ve talked before about how these are the years when skilled winemakers stand out</a>; these are the years when being selective about every single bunch of grapes is the key to producing quality wine. Now that the 2011 season is shaping up to be a repeat of the last two years, grape growers in Sonoma County are adapting to the shift in weather patterns. Growers were heavily culling formative grape clusters <a href="http://deerfieldcellarrat.com/cellar-rat-blog/2010/6/2/vying-with-vines.html">before fruitset even occurred</a>, hoping to channel every ounce of captured sunlight into the remaining grapes. Last year many farmers cut most of the leaves off the vines, thinning the canopy to expose the grapes to more sunlight. That backfired when over two days in late August, a blistering heatwave scorched the rows of unprotected grapes. This year, the canopy is being left thicker, particularly on the sunny side and the plan is to lower the wires that hold the canes upright to provide emergency shade in case history repeats itself. Even though most grapes are as much 20 days behind, 2011 could be an ideal year if the sun continues to break through the fog and the fall doesn&rsquo;t come early. The cooler, longer summer will produce great flavors at lower potential alcohol levels. Cautious optimism seems to be the prevailing sentiment, which is typical of growers and winemakers.</p>
<p>I believe that whatever the cause, climate change poses tremendous risk to our environment, yet our culture will shift with the weather. Winegrowing regions are quite diverse throughout the world; the arid plains of Spain are nothing like the chilly slopes of the Mosel Valley. It is possible that due to changing ecosystems, the terroir of renowned growing regions will be dramatically altered. Winemaker Robert Rex believes that the shift towards a cooler growing season is here to stay in the California North Coast. That doesn&rsquo;t mean that we&rsquo;re going to stop growing grapes or making world-class wine. No &ndash; it means that we&rsquo;ll adapt to our new environment by producing wine that reflects the changing terroir. Only time will tell what the landscape will look like in 50 years, but whatever the outcome I&rsquo;m sure that Sonoma will be famous for its wines for centuries to come. Perhaps Napa Valley will become famous for Pinot Noir instead of Cabernet.</p>]]></content></entry><entry><title>Sustainability: Thinking In The Long-term</title><category term="biodynamic"/><category term="organic"/><category term="sustainability"/><category term="water conservation"/><id>http://deerfieldcellarrat.com/cellar-rat-blog/2011/8/10/sustainability-thinking-in-the-long-term.html</id><link rel="alternate" type="text/html" href="http://deerfieldcellarrat.com/cellar-rat-blog/2011/8/10/sustainability-thinking-in-the-long-term.html"/><author><name>The Cellar Rat</name></author><published>2011-08-10T20:39:14Z</published><updated>2011-08-10T20:39:14Z</updated><content type="html" xml:lang="en-US"><![CDATA[<p>You&rsquo;ve probably heard the words &ldquo;organic&rdquo;, &ldquo;biodynamic&rdquo; and &ldquo;sustainability&rdquo; floating around the wine industry. But what do these terms really mean? Each of them represents different ideologies that overlap in certain areas, yet each contains their own distinct notions about how agriculture can better nourish people while contributing to the health of the ecosystem. <a href="http://deerfieldcellarrat.com/cellar-rat-blog/2010/12/1/vineyard-voodoo.html">In this article, I talked about the concepts behind biodynamic farming as they compare to organic farming</a>. Sustainability is a concept that relates to both biodynamic and organic farming in that it seeks to promote environmental stewardship. At the core of sustainability is the forward-thinking goal of developing business so that it may benefit humanity, while maintaining and improving the surrounding ecosystem so that precious resources are there for future generations. To name a few things, sustainability means conserving water, utilizing renewable energy sources, limiting waste, and lowering one&rsquo;s overall carbon footprint.&nbsp; A sustainable vineyard is a field of grapevines that can be harvested year after year, in perpetuity, without negatively impacting any other ecosystem or community.</p>
<p><span class="full-image-float-left ssNonEditable"><span><img src="http://deerfieldcellarrat.com/storage/post-images/sustainability-diagram1.png?__SQUARESPACE_CACHEVERSION=1313009281178" alt="" /></span></span>&ldquo;The Three Es&rdquo; are the cornerstone of sustainability. Sustainability recognizes that for a business to be sustainable it must not only respect the environment, but it must also be economically viable and welcomed by the community. In the view of sustainability, a business needs to be <strong>E</strong>nvironmentally Sound, <strong>E</strong>conomically Feasible and Socially <strong>E</strong>quitable. In the long-term, any endeavor that lacks one of these qualities will fail. Sustainability strives to balance each of these essentials so that a business may continue to function over a long period of time.</p>
<p>Surrounding each of the ideas of organic, biodynamic and sustainable farming are institutions that try to promote them. The now ubiquitous term &ldquo;organic&rdquo; took decades to get to a point where it could only be used on product packaging if it was certified by one of several organizations recognized by the government. Deerfield&rsquo;s vineyards and winery are certified organic by <a href="http://www.ccof.org/">California Certified Organic Farmers</a> (CCOF) which was founded in the 1970s. CCOF guidelines are among the most rigorous and its seal of approval is one of the most prestigious. Of all the wineries in Sonoma County, only two are certified by CCOF. Sustainability is still a developing idea and the use of the term is yet to be well regulated. Formative organizations like the <a href="http://www.sustainablewinegrowing.org/"><span style="text-decoration: underline;">California Sustainable Winegrowing Alliance</span></a> (CSWA) are beginning to offer sustainability certifications for wineries and vineyards.</p>
<p>Ultimately, a shift towards sustainably made products will have to come from increased consumer demand. That demand for sustainably made goods will only be created if consumers have a clear idea of what sustainability is and have confidence that if a product says it&rsquo;s sustainable, it reflects those ideas in how it&rsquo;s made. The sustainability movement is making progress to that end: <a href="http://www.sustainablewinegrowing.org/docs/cswa_gwsesp_brochure.pdf">The Global Wine Sector Environmental Sustainability Principles</a> is an international organization aimed at creating legitimate credentials for sustainability that are recognized by governments worldwide. It has affiliate programs in four winegrowing countries including South Africa, New Zealand, Australia and the U.S.</p>
<p>It is more difficult to apply one set of rules for sustainability than it is for organic farming because what makes an industry sustainable can vary dramatically. What it takes to make a fishery sustainable would probably be very different than what it would take for a paper mill. For this reason, the CSWA has formulated <a href="http://www.sustainablewinegrowing.org/swpcertification.php">a cycle for continuous improvement</a> that involves assessment, planning, implementation and auditing, which could be applied to any industry. As usual, the wine industry is leading the pack in affecting positive environmental change.</p>
<p>Deerfield Ranch Winery is doing its part in the global movement towards sustainability. In fact, it&rsquo;s a model for sustainable winemaking practices. One of the main obstacles facing the wine industry today is water usage. Deerfield&rsquo;s solution to this concern was to construct our own bioreactor, <a class="tip4" title="Episode 22 (Part 1) - Water Conservation" href="http://www.youtube.com/watch?v=fyXD4N2EsgI&amp;fs=1">which you can take a tour of with the winemaker here</a>. It allows us to recycle 98% of the water we use so that we may irrigate our crops. Combined with techniques like steam barrel cleaning, Deerfield has an unparalleled level of water conservation. Also, all of our organic waste is collected and composted to provide fertilizer for the vineyards. Deerfield has proven how a winery can be a steward to its surrounding environment by its care of a rare wetland known as the Kenwood Marsh, the last remaining wetland in the Sonoma Valley. The Deerfield Ranch Winery granted a permanent easement to Sonoma County so that the marsh will remain untouched for future generations and the Rex family has set up a non-profit organization known as the Kenwood Marsh Checkerbloom Society to protect the endangered Checkerbloom plant and restore and maintain the Kenwood Marsh. Last year, the Sonoma County Water Agency granted Deerfield its Sonoma Valley Groundwater Management Program Water Conservation Award in recognition of Deerfield&rsquo;s conservation efforts.</p><p></p>]]></content></entry><entry><title>How-To: Gravity Irrigated Barrel Garden</title><category term="barrels"/><category term="home garden"/><category term="how to"/><category term="irrigation"/><id>http://deerfieldcellarrat.com/cellar-rat-blog/2011/7/25/how-to-gravity-irrigated-barrel-garden.html</id><link rel="alternate" type="text/html" href="http://deerfieldcellarrat.com/cellar-rat-blog/2011/7/25/how-to-gravity-irrigated-barrel-garden.html"/><author><name>The Cellar Rat</name></author><published>2011-07-26T00:43:38Z</published><updated>2011-07-26T00:43:38Z</updated><content type="html" xml:lang="en-US"><![CDATA[<p style="text-align: center;"><img src="http://deerfieldcellarrat.com/storage/thumbnails/4399199-13369037-thumbnail.jpg?__SQUARESPACE_CACHEVERSION=1311641708972" alt="" /></p>
<p>
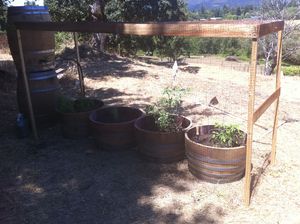
Barrels can only be used for so long before they become unfit for making wine, so every year wineries get rid of their old barrels and make room for the new. In wine country this abundance of barrels prompts people to get creative with these beautiful industry relics. I decided, like so many others, that I would like to turn a few into planters. Just one problem though: I live on a hill without any water. Carrying water up the hill all the time or lugging a super long hose up each time would be impractical, so I devised a gravity irrigated planter system. That way I only have to fill up the barrel about once a month and in wetter seasons I can also catch rainwater. I thought I&rsquo;d do a little how-to article for those of you inspired to build a mini-garden yourself! &nbsp;The total project cost was less than $150 and took me 8 hours to complete.</p>
<p><em>Note: At the bottom of the article is a link to a printer friendly version if you want to take the instructions into the backyard.</em></p>
<p>I was able to get all these parts at my local hardware store. Here&rsquo;s what you&rsquo;ll need:</p>
<ul>
<li>At least 3 barrels (I used 4 but you can also just build a platform to elevate the water barrel, or just put it on a hill!)</li>
<li>1 silicon barrel bung</li>
<li>1 &frac34;&rdquo; hose Pressure regulator (I used a 25psi regulator)</li>
<li>2 &frac34;&rdquo; mesh screen filter</li>
<li>1 &frac34;&rdquo; hose Y valve</li>
<li>1 &frac34;&rdquo; hose valve (like a faucet)</li>
<li>2 adapters to convert &frac34;&rdquo; hose to &frac14;&rdquo; irrigation tubing</li>
<li>100 ft. &frac14;&rdquo; irrigation tubing (I actually only used about 60ft. Make sure not to get the dripping kind!)</li>
<li>6 Tee joints for &frac14;&rdquo; irrigation tubing</li>
<li>8 inline drips for &frac14;&rdquo; irrigation tubing (1/2 GPH drip rate)</li>
<li>8 end of line drips for &frac14;&rdquo; irrigation tubing (again &frac12; GPH drip rate)</li>
<li>16 irrigation stakes</li>
<li>4 small clips with nails (used to nail TV cable into place)</li>
<li>2 small hook screws</li>
<li>Black electric tape</li>
<li>Silicon glue</li>
<li>12 cubic feet of potting soil</li>
<li>Enclosure to protect against deer and birds (may not be an issue in your backyard but I definitely needed this part)</li>
</ul>
<p>o&nbsp;&nbsp; 3 10ft. redwood benderboards</p>
<p>o&nbsp;&nbsp; 4 2x2 cedar stakes &ndash; 6ft. long ea.</p>
<p>o&nbsp;&nbsp; &frac12;&rdquo; Staples</p>
<p>o&nbsp;&nbsp; ~16 nails</p>
<p>o&nbsp;&nbsp; Deer netting (I used Deer X brand &ndash; 1 package of 100&rsquo;X7&rsquo; was more than enough)</p>
<ul>
<li>Tools:</li>
</ul>
<p>o&nbsp;&nbsp; &frac34;&rdquo; hole saw and drill</p>
<p>o&nbsp;&nbsp; Skill saw</p>
<p>o&nbsp;&nbsp; Hammer</p>
<p>o&nbsp;&nbsp; Staple Gun</p>
<p>o&nbsp;&nbsp; Barrel driver (this tool is used to remove the hoops from the barrel, you can use a small crowbar or probably a very large sturdy screwdriver)</p>
<p>o&nbsp;&nbsp; Measuring tape</p>
<p>I was able to get my barrels for free and you probably can too. My tip is to call wineries around June or July, when they&rsquo;re cleaning house for harvest. Some wineries have prearranged solutions to deal with their barrels but you&rsquo;d be surprised how many people would be more than happy to have someone just take them off their hands. Ask for an old bung while you&rsquo;re at it!</p>
<p>Ok. Now for the how-to part:</p>
<p>Part I: Making the water storage barrel</p>
<p>1.&nbsp;&nbsp;&nbsp;&nbsp;&nbsp;&nbsp; You&rsquo;ll need to remove the hoops from one side of a barrel to take the head (end piece) of the barrel off. With the barrel upright, use the barrel driver (crow bar) and hammer to knock the hoops off of the end on the ground (it&rsquo;s easier to strike down than up), starting with the largest hoop. Move around the barrel in a circle, tapping in different spots on the same hoop as you go. You can <a class="tip4" title="Episode 23 (Part 2) - Building A Barrel" href="http://www.youtube.com/watch?v=8h2pRs6pweI&amp;fs=1">watch this episode of Cellar Rat TV, where master cooper Francis Durand, of Radoux Tonnellerie, builds a barrel</a>, to see the technique.</p>
<p>2.&nbsp;&nbsp;&nbsp;&nbsp;&nbsp;&nbsp; Once the hoops are off you should be able to easily remove the head from the barrel. It&rsquo;ll probably even just fall out by itself.</p>
<p>3.&nbsp;&nbsp;&nbsp;&nbsp;&nbsp;&nbsp; Flip the barrel over and now replace the hoops in the same fashion. You&rsquo;ll need to start with the largest hoop again and start banging it into place before the smaller ones will fit on.
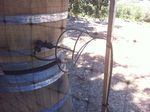
</p>
<p>4.&nbsp;&nbsp;&nbsp;&nbsp;&nbsp;&nbsp; Now that the barrel is back together, with the head off you can drill the holes at the bottom for the valves. Use the &frac34;&rdquo; hole saw to drill out two holes on the side of the barrel on the opposite end from the side that you removed the head from. Make sure that these holes are above the head of this end so that you don&rsquo;t drill into it. You may have to drill the holes slightly above the actual bottom of where the vessel retains water because the metal hoop may be in the way. If the bunghole of the barrel is at 12 o&rsquo;clock drill one of the holes at 6 o&rsquo;clock and the other at 9 o&rsquo;clock (or 3 o&rsquo;clock depending on whether you want your water barrel to be on the right or left of your planters &ndash; you want this hole to be on side that you work on the planters because it will be a work faucet).</p>
<p>5.&nbsp;&nbsp;&nbsp;&nbsp;&nbsp;&nbsp; Firmly insert the bung into the bunghole (twist it in, don&rsquo;t bang it in) and seal it with the silicon.</p>
<p>6.&nbsp;&nbsp;&nbsp;&nbsp;&nbsp;&nbsp; Spread some silicon around the pressure regulator and then bang it into the hole at 6 o&rsquo;clock from the inside of the barrel (you&rsquo;ll need to climb in) &ndash; it should be a very snug fit. Then seal both inside and outside the barrel with more silicon.</p>
<p>7.&nbsp;&nbsp;&nbsp;&nbsp;&nbsp;&nbsp; Do the same for the &frac34;&rdquo; valve (not the Y valve) into the hole at 9 o'clock.</p>
<p>8.&nbsp;&nbsp;&nbsp;&nbsp;&nbsp;&nbsp; Allow the silicon to dry for at least an hour.</p>
<p>9.&nbsp;&nbsp;&nbsp;&nbsp;&nbsp;&nbsp; Insert the &frac34;&rdquo; inch mesh filter screens into the end of both pieces on the inside of the barrel.</p>
<p>10.&nbsp;&nbsp; Screw the &frac34;&rdquo; Y valve onto the pressure regulator so that it fits very tightly.</p>
<p>11.&nbsp;&nbsp; Screw the 2 &frac34;&rdquo; to &frac14;&rdquo; adapters onto both of the Y valve ends (I needed a wrench to prevent leakage).</p>
<p>12.&nbsp;&nbsp; (Optional) Take the skill saw and cut a few staves (pieces of wood that make the barrel up) out between the two center hoops of ANOTHER barrel to have a little storage space for your garden tools.</p>
<p>13.&nbsp;&nbsp; Stack the water barrel on top of the barrel you just cut a few staves out of. I used a couple pieces of wood from the head of the water barrel so that the barrels could be stacked stably. Make sure that the barrels are level and stable. Be careful that they don&rsquo;t tip over on you or that you don&rsquo;t pinch your hand. You might need two people for this part. Point the Y valve towards the planter row and the regular valve towards the front (where you&rsquo;ll work on the planters).</p>
<p>Part II: Making the planter beds</p>
<p>1.&nbsp;&nbsp;&nbsp;&nbsp;&nbsp;&nbsp; You may want your planters to be bottomless so that the roots can grow into the soil below. If that&rsquo;s the case then remove the heads first like you did with the water barrel. Do it one at a time, replacing the hoops before you do the other end, otherwise the barrel will fall apart and you&rsquo;ll never get it back together.</p>
<p>2.&nbsp;&nbsp;&nbsp;&nbsp;&nbsp;&nbsp; In order to cut the barrel straight across you need to measure. Measure between the two center hoops and divide by two. Then measure that length along the line between two staves and make a mark. Go around the barrel doing this every 2 or 3 staves. Then connect the dots using your measuring tape. You should have a line around the circumference of the widest part of the barrel.</p>
<p>3.&nbsp;&nbsp;&nbsp;&nbsp;&nbsp;&nbsp; Put the barrel on its side and be extremely careful using the skill saw to cut down the line. I recommend cutting a length, stopping the saw, rotating the barrel a bit more and then resuming &ndash; turning as you cut is VERY dangerous.</p>
<p>4.&nbsp;&nbsp;&nbsp;&nbsp;&nbsp;&nbsp; If you left the heads on, depending on what you intend to plant and what climate you&rsquo;re in, you may want to drill some holes in the bottom of the planter for water drainage. You can use the hole saw for that.</p>
<p>5.&nbsp;&nbsp;&nbsp;&nbsp;&nbsp;&nbsp; Arrange the planters in a row right next to your water tower with the Y valve facing the row.</p>
<p>Part III: Making the enclosure - This part is only necessary if deer and birds are an issue in your garden, but if they are I recommend you do this before you hook up the irrigation to your planters.</p>
<p>1.&nbsp;&nbsp;&nbsp;&nbsp;&nbsp;&nbsp; Cut the bender board into 2 ten foot long pieces and 2 four foot long pieces.</p>
<p>2.&nbsp;&nbsp;&nbsp;&nbsp;&nbsp;&nbsp; Nail boards to the top of the cedar stakes to make your frame.</p>
<p>3.&nbsp;&nbsp;&nbsp;&nbsp;&nbsp;&nbsp; Place the frame over the planters and mark where the posts will go.</p>
<p>4.&nbsp;&nbsp;&nbsp;&nbsp;&nbsp;&nbsp; Dig holes for the posts in the spots that you marked.</p>
<p>5.&nbsp;&nbsp;&nbsp;&nbsp;&nbsp;&nbsp; Put the posts in the holes and pack in the dirt firmly.</p>
<p>6.&nbsp;&nbsp;&nbsp;&nbsp;&nbsp;&nbsp; Take the deer netting and staple it around the frame. I used one piece to cover the back and sides and one piece to cover the top. For the front where you work, <strong>staple the netting along the top edge only</strong>. Then screw the small hook screws into the base of the two posts on the front side. This way this piece can just swing up and out of the way, letting you have full access to your planters, and when you&rsquo;re done, just fasten the bottom of the net to the two hooks on the bottom of the frame.</p>
<p>Part IV: Hooking up the irrigation</p>
<p>1.&nbsp;&nbsp;&nbsp;&nbsp;&nbsp;&nbsp; Cut 2 lengths of irrigation tubing long enough so that the tubing reaches from the Y valve to the inside of the netting enclosure.</p>
<p>2.&nbsp;&nbsp;&nbsp;&nbsp;&nbsp;&nbsp; Cut one end of each tube at a 45 degree angle and insert each tube into each port of the Y valve with the adapters. &nbsp;Stick the tubes through the netting.</p>
<p>3.&nbsp;&nbsp;&nbsp;&nbsp;&nbsp;&nbsp; On the inside of the enclosure, take two of the T joints and insert the base of each tee joint into both tubes.</p>
<p>4.&nbsp;&nbsp;&nbsp;&nbsp;&nbsp;&nbsp; Now insert one end of the irrigation tubing onto any one of the four ports. Run the tubing to the back post, closest to the water barrel, and use a piece of tape to hold it in place. Then run the tubing down the post and use a piece of tape to hold it in place a few inches below the top of the planters. Then run the tube over to the nearest planter bud, and up over the top of the bed, into the center about 6 inches and cut the tube (more is better because you can always go back and trim later).</p>
<p>5.&nbsp;&nbsp;&nbsp;&nbsp;&nbsp;&nbsp; Repeat this process to measure each of the rest of the tubes to each planter. You should have all four main lines hooked up now.</p>
<p>6.&nbsp;&nbsp;&nbsp;&nbsp;&nbsp;&nbsp; <span class="thumbnail-image-float-right ssNonEditable"><span><a href="javascript:showFullImage('/display/ShowImage?imageUrl=%2Fstorage%2Fpost-images%2FPhoto%20Jul%2025%201%2024%2029%20PM.jpeg%3F__SQUARESPACE_CACHEVERSION%3D1311641861233',1936,2592);"><img src="http://deerfieldcellarrat.com/storage/thumbnails/4399199-13369084-thumbnail.jpg?__SQUARESPACE_CACHEVERSION=1311641865354" alt="" /></a></span></span>Use the electrical tape to neatly bundle all four lines and also to attach the lines to the post in both spots you used during the measuring process.</p>
<p>7.&nbsp;&nbsp;&nbsp;&nbsp;&nbsp;&nbsp; Now take the 4 small clips and nail the irrigation tubing for each planter into place just below the edge of the back of the planter.</p>
<p>8.&nbsp;&nbsp;&nbsp;&nbsp;&nbsp;&nbsp; Pull the slack out of each line and use more electrical tape to make the tubes neat in the back.</p>
<p>9.&nbsp;&nbsp;&nbsp;&nbsp;&nbsp;&nbsp; Cut all of the tubes to the same length on the inside of the bed &ndash; about 6 inches.</p>
<p>10.&nbsp;&nbsp; Insert the base of the remaining 4 tee joints into each tube.</p>
<p>11.&nbsp;&nbsp; Cut 16 6 inch long pieces of tubing.</p>
<p>12.&nbsp;&nbsp; Attach two pieces of tubing onto each of the 2 ports of each tee joint.</p>
<p>13.&nbsp;&nbsp; Now attach an in-line dripper onto the end of each tube. Make sure you follow the directions on the package for the correct way to attach the drippers.</p>
<p>14.&nbsp;&nbsp; Put another length of tube on each dripper.</p>
<p>15.&nbsp;&nbsp; Attach the end-of-the-line dippers on the end of each of the tubes.</p>
<p>16.&nbsp;&nbsp; Attach the irrigation stakes next to each of the drippers.</p>
<p>17.&nbsp;&nbsp; Fill the planting beds with the potting soil and tamp the dirt down.</p>
<p>18.&nbsp;&nbsp; <span class="thumbnail-image-float-right ssNonEditable"><span><a href="javascript:showFullImage('/display/ShowImage?imageUrl=%2Fstorage%2Fpost-images%2FPhoto%20Jul%2025%201%2024%2022%20PM.jpeg%3F__SQUARESPACE_CACHEVERSION%3D1311641908073',1936,2592);"><img src="http://deerfieldcellarrat.com/storage/thumbnails/4399199-13369099-thumbnail.jpg?__SQUARESPACE_CACHEVERSION=1311641912926" alt="" /></a></span></span>
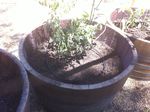
Set the stakes so that each drip head is about halfway to the center of the planter in each quarter of the barrel.</p>
<p>19.&nbsp;&nbsp; Pat yourself on the back.</p>
<p>Now go pick out your favorite herbs and veggies and get those beds planted! I did a test and found that you&rsquo;ll have about 15 hours of irrigation time before you need to fill the barrel again. I think about an hour of drip time per day is enough so that means you can go two weeks without having to refill your system (or more if you get rain)! The faucet on the side is good to fill up a water can to get the leaves wet or rinse your hands after working in the soil. I hope all you do-it-yourself types have fun with this little project. Let me know if you dream up any improvements or awesome variations! Next I&rsquo;m going to build a little fence out of barrel staves.</p>
<p>﻿</p><p><br/><br/></p>]]></content></entry><entry><title>Rhymes With Heritage</title><category term="blending"/><category term="bordeaux"/><category term="meritage"/><id>http://deerfieldcellarrat.com/cellar-rat-blog/2011/7/14/rhymes-with-heritage.html</id><link rel="alternate" type="text/html" href="http://deerfieldcellarrat.com/cellar-rat-blog/2011/7/14/rhymes-with-heritage.html"/><author><name>The Cellar Rat</name></author><published>2011-07-14T21:20:30Z</published><updated>2011-07-14T21:20:30Z</updated><content type="html" xml:lang="en-US"><![CDATA[<p><span class="full-image-float-left ssNonEditable"><span><img style="width: 150px;" src="http://deerfieldcellarrat.com/storage/2000meritageladi203x700.png?__SQUARESPACE_CACHEVERSION=1310678645830" alt="" /></span></span>Yet while many people enjoy Meritage wines, I&rsquo;ve found that many don&rsquo;t know much about these delightfully complex wines which are essentially synonymous with &ldquo;Bordeaux blend&rdquo;. I&rsquo;ve noticed that many wine enthusiasts are inexorably drawn to pronouncing Meritage with a long &ldquo;a&rdquo;, as in montage. The propensity to Frenchify the word is perfectly understandable, because otherwise we&rsquo;d all be going around convinced that Cabernet rhymes cabinet. However, Meritage is instead a purely American invention that rhymes with heritage. It was coined by <a href="http://www.meritagealliance.com/home">the Meritage Associatio</a>n out of necessity, because in the same way that Champagne can only be so-called when it is made in the Champagne region of France, international law forbids the Bordeaux moniker from being applied to wines produced elsewhere. Recognizing the need, some clever Californians in the 1980s joined the words &ldquo;merit&rdquo; and &ldquo;heritage&rdquo;, thusly creating the word &ldquo;Meritage&rdquo;. The Meritage Association (now known as the Meritage Alliance) dictates precisely what constitutes a Meritage wine and a winery must belong to the Alliance (and pay them tithes) in order to make use of the trademarked name on their label.</p>
<p>According to the Alliance&rsquo;s website, a Meritage must be a blend of at least two of the Bordeaux varietals Cabernet Sauvignon, Cabernet Franc, Merlot, Malbec and Petit Verdot, and must contain no more than 90% of a single varietal. Less common Bordeaux varietals that may also me included are St. Macaire, Gros&nbsp; Verdot and Garmen&egrave;re. Although Deerfield doesn&rsquo;t make one, there is such a thing as a white Meritage. These wines must be a blend of Sauvignon Blanc and S&eacute;millon (or the rarer Sauvignon Vert).</p>
<p>The term Meritage isn&rsquo;t an official term recognized by alcohol regulators, and is instead merely intended to represent that the wine is a Bordeaux blend. The creators of the term perceive blends to be the highest form of the winemaker&rsquo;s art and indeed, we pay homage to that ideal in that <a href="https://www.rexfamilywineries.com/xe/xe.asp?page=viewitem&amp;p=02DRX&amp;cat=blends">Deerfield&rsquo;s flagship wine, DRX, is a Meritage blend</a>. Few wines better exemplify the winemaker&rsquo;s craft than a Meritage made by Winemaker Robert Rex. After all, blending is his specialty. To produce it, Robert tastes every barrel of Bordeaux varietals he made in a given year and then selects the very best barrels from the various lots that will make it into this blend. Think of it as an exclusive party that requires the right credentials to attend. He then creates the blend with the Old World in mind: Less focus on fruit forwardness, and more attention to structure, elegance and terroir. The sense of place that accompanies the DRX springs from the earthiness that defines it.</p>
<p>Now that you&rsquo;re in the know, be careful! You&rsquo;ll find that 90% of the people you encounter, sometimes even those steeped in wine lore, love a good Meri-tah-ge. I usually don&rsquo;t mention the correct pronunciation unless I&rsquo;m asked. Besides, it&rsquo;s not the pronunciation that matters &ndash; it&rsquo;s what&rsquo;s in the bottle that makes the difference!</p>
<p>﻿</p>]]></content></entry><entry><title>Corkscrew Showdown</title><category term="corkscrews"/><category term="how to"/><id>http://deerfieldcellarrat.com/cellar-rat-blog/2011/6/24/corkscrew-showdown.html</id><link rel="alternate" type="text/html" href="http://deerfieldcellarrat.com/cellar-rat-blog/2011/6/24/corkscrew-showdown.html"/><author><name>The Cellar Rat</name></author><published>2011-06-24T22:08:28Z</published><updated>2011-06-24T22:08:28Z</updated><content type="html" xml:lang="en-US"><![CDATA[<p>It takes a lot of work to get wine into the bottle and sometimes it takes a lot of work to get it back out! Not everyone in the wine industry knows what it takes to make wine, yet everybody seems to have an opinion on the ubiquitous companion of the wine bottle: the corkscrew. Unlike beer bottles, which can be opened by all manner of party tricks, wine bottles require a bit of gadgetry to free the genie (although if you are caught in a tight spot here&rsquo;s a <a class="tip4" title="Opening A Bottle Of Wine Using Only A Shoe" href="http://www.youtube.com/watch?v=ZuGfjtBffiE&amp;fs=1">clever way to open a wine bottle using only a shoe</a>). They come in all shapes and sizes and everyone seems to have their favorite, so I thought I&rsquo;d weigh in on the long running debate of which is the best corkscrew.</p>
<p>I&rsquo;m sure that as soon as the cork was invented, people around the world began to devise methods to remove it. In fact so many wonderfully diverse solutions have been developed that there seems to be as many different types of corkscrews as there are wines.&nbsp; I&rsquo;ve tried to break them down into a couple categories that they fall into:</p>
<p><strong>Heavy Machinery</strong> &ndash; Anything with a mount falls into this category. Usually these attach to a countertop or wall but sometimes they have their own base to sit on a table top. These typically use a lever design where all you need to do is place the neck under the corkscrew and pull the lever down and then back up and voila!</p>
<p style="text-align: center;"><img src="http://deerfieldcellarrat.com/storage/thumbnails/4399199-12891797-thumbnail.jpg?__SQUARESPACE_CACHEVERSION=1308955230078" alt="" /></p>
<p><strong>Cellar Rat Opinion Poll</strong>: Obviously the lack of portability kicks them out of the running for top pick but their smooth action is very nice when they&rsquo;re around. They&rsquo;re especially useful when you need to open lots of bottles at a bar. I particularly like ones that eject the cork like a shotgun cartridge!</p>
<p><strong>&ldquo;Houdini&rdquo; Style Lever Operation</strong> &ndash; These guys operate using the same mechanism as the Heavy Machinery except that instead of mounting they have arms that grip the bottle. The lever automatically spins the screw into the cork as the handle is pushed down.</p>
<p style="text-align: center;"><img src="../../storage/thumbnails/4399199-12891788-thumbnail.jpg?__SQUARESPACE_CACHEVERSION=1308955317427" alt="" /></p>
<p><strong>Cellar Rat Opinion Poll:</strong> I don&rsquo;t like these at all. They typically offer some smooth operation but they don&rsquo;t fit in your pocket and are kind of bulky, though companies are beginning to offer some more refined models. Usually they don&rsquo;t come with foil cutters attached so even though you&rsquo;ve got this bulky thing, you&rsquo;ve got to keep track of another gadget.</p>
<p><strong>Double Lever Corkscrew</strong> &ndash; These are the ones that look kind of like a woman wearing a dress. You place the corkscrew over the neck of the bottle then hand twist the screw which lifts the levers. Pulling down both levers gives you double the leverage for an easy pull.<span class="thumbnail-image-block ssNonEditable"><span><a href="javascript:showFullImage('/display/ShowImage?imageUrl=%2Fstorage%2Fpost-images%2Fcorkscrews%2Fdouble-lever-corkscrew%3F__SQUARESPACE_CACHEVERSION%3D1308955406851',1236,1439);"></a></span></span></p>
<p style="text-align: center;"><img src="http://deerfieldcellarrat.com/storage/thumbnails/4399199-12891792-thumbnail.jpg?__SQUARESPACE_CACHEVERSION=1308955406855" alt="" /></p>
<p><strong>Cellar Rat Opinion Poll:</strong> These are by far my least favorite style and it seems like the idea has been rethought because I&rsquo;m starting to see them less and less. I&rsquo;ve never seen a wine professional use one of these on the job. They&rsquo;re awkward because the arms lift as you screw so you can&rsquo;t really hold the corkscrew to begin the operation.</p>
<p><strong>The Classic Waiter&rsquo;s Corkscrew</strong> &ndash; The quintessential corkscrew. These Swiss Army Knife-like openers fold up to fit in your pocket and almost always have a foil cutter attached. They vary dramatically in quality and ease of use. Some are much better than others and the type of foil cutter also differs depending on the model.<span class="thumbnail-image-block ssNonEditable"><span><a href="javascript:showFullImage('/display/ShowImage?imageUrl=%2Fstorage%2Fpost-images%2Fcorkscrews%2Fwaiters-corkscrew%3F__SQUARESPACE_CACHEVERSION%3D1308955596176',500,500);"></a></span></span></p>
<p style="text-align: center;"><img src="http://deerfieldcellarrat.com/storage/thumbnails/4399199-12891795-thumbnail.jpg?__SQUARESPACE_CACHEVERSION=1308955596181" alt="" /></p>
<p><strong>Cellar Rat Opinion Poll:</strong> Hands down, a great waiter&rsquo;s corkscrew is a Cellar Rat&rsquo;s best friend. Pick carefully though because it&rsquo;s the subtleties here that make the difference. Quality is key. I&rsquo;ve had the screw snap off before in the line of duty, which is always embarrassing. I like serrated cutters much more that non-serrated. Also there have been some innovations that have really changed the game. Nowadays, most waiter&rsquo;s corkscrews have what&rsquo;s known as a &ldquo;2-step&rdquo; operation. This means they have a second notch to gain purchase with so that you don&rsquo;t have to work as hard to get it started. So far I&rsquo;ve seen two designs: A hinged approach which I DO NOT recommend as they have the tendency to wear out and to bend inward. I recommend the 2-step that is actually made out of two separate pieces. My favorite is the Metrokane Rabbit Zippity. Funny name but it&rsquo;s got everything:&nbsp; High quality, durable make? Check. Serrated blade? Check. 2-step, non-hinge lever. Check. Slim and sleek design. Check.</p>
<p><strong>Boomerang Corkscrew</strong> &ndash; Similar to the waiter&rsquo;s corkscrew design but they usually don&rsquo;t have 2-step operation. Instead they feature a moving pivot point to improve the leverage. They are distinctive in that they feature a foil cutter that uses four little discs instead of knife.<span class="thumbnail-image-block ssNonEditable"><span><a href="javascript:showFullImage('/display/ShowImage?imageUrl=%2Fstorage%2Fpost-images%2Fcorkscrews%2Fboomerang-corkscrew%3F__SQUARESPACE_CACHEVERSION%3D1308955648880',400,400);"></a></span></span></p>
<p style="text-align: center;"><img src="http://deerfieldcellarrat.com/storage/thumbnails/4399199-12891790-thumbnail.jpg?__SQUARESPACE_CACHEVERSION=1308955648885" alt="" /></p>
<p><strong>Cellar Rat Opinion Poll:</strong> While I still prefer the waiter&rsquo;s version, there are some nice perks to this type of corkscrew. The disc foil cutter is much safer and easier to use than the knife which takes a little technique and practice. I&rsquo;ve seen many a veteran cut themselves with a knife when moving too fast. Also if you&rsquo;re trying to get a perfect edge it seems like this type of cutter yields results everytime. If you&rsquo;re looking for safety (maybe you&rsquo;ve got kids around) this might be a better choice for you.</p>
<p><strong>Miscellaneous</strong> &ndash; You might remember those weird corkscrews that aren&rsquo;t corkscrews at all, but instead have two prongs - low tech and tricky, yet effective. Now they also have electric ones that do all the work for you with the press of a button. I&rsquo;m sure there are many more unconventional approaches yet to be discovered.<span class="thumbnail-image-block ssNonEditable"><span><a href="javascript:showFullImage('/display/ShowImage?imageUrl=%2Fstorage%2Fpost-images%2Fcorkscrews%2Felectric-corkscrew%3F__SQUARESPACE_CACHEVERSION%3D1308955704611',400,400);"></a></span></span></p>
<p style="text-align: center;"><img src="http://deerfieldcellarrat.com/storage/thumbnails/4399199-12891793-thumbnail.jpg?__SQUARESPACE_CACHEVERSION=1308955704616" alt="" /></p>
<p style="text-align: center;"><span class="thumbnail-image-block ssNonEditable"><span><a href="javascript:showFullImage('/display/ShowImage?imageUrl=%2Fstorage%2Fprong-corkscrew%3F__SQUARESPACE_CACHEVERSION%3D1308955767152',500,500);"><img src="http://deerfieldcellarrat.com/storage/thumbnails/4399199-12891938-thumbnail.jpg?__SQUARESPACE_CACHEVERSION=1308955767157" alt="" /></a></span></span></p>
<p><strong>Cellar Rat Opinion Poll:</strong> There are some pretty nifty and quirky openers out there but I&rsquo;d rather have my trusty Zippity than a conversation piece. Until the next great thing comes out I&rsquo;m relying on my waiter&rsquo;s corkscrew to get the job done.</p>
<p>The waiter&rsquo;s corkscrew may be my favorite but I&rsquo;ll admit that it can require a little finesse. Here's a few tips to use one safely and effectively:</p>
<ol>
<li>Put the back of the cutter blade against your thumb and use your forefinger to firmly grip around the neck of the bottle.</li>
<li>Angle the blade down towards the collar of the bottle (<a href="http://deerfieldcellarrat.com/cellar-rat-blog/2010/8/25/the-anatomy-of-a-bottle.html">See my "Anatomy of the Bottle" post</a>) and rotate the bottle while applying firm pressure.</li>
<li>Hold the point of the screw along your extended index finger to precisely guide the point into the cork slightly off center. This way when you begin to twist the screw in it will be centered.</li>
<li>If you have a 2-step corkscrew make use of the double step! Start with the notch closest to the fulcrum and then move to the one on the end.</li>
<li>When the cork pops, expect the sudden release tension so that you don't spill the wine by jerking the bottle.</li>
</ol>
<p>Now you're ready to open bottles like a pro!</p>]]></content></entry><entry><title>How Clean Wine Is Made</title><category term="clean wine"/><category term="water conservation"/><category term="winemaking"/><id>http://deerfieldcellarrat.com/cellar-rat-blog/2011/6/15/how-clean-wine-is-made.html</id><link rel="alternate" type="text/html" href="http://deerfieldcellarrat.com/cellar-rat-blog/2011/6/15/how-clean-wine-is-made.html"/><author><name>The Cellar Rat</name></author><published>2011-06-15T18:03:54Z</published><updated>2011-06-15T18:03:54Z</updated><content type="html" xml:lang="en-US"><![CDATA[<p>Deerfield Ranch Winery focuses on what we call &ldquo;clean&rdquo; wine. Clean wine is low in both sulfites and the histamines that are created by the yeast. What this means to you is that you can enjoy Deerfield wines without the fear of the dreaded red wine headache or a sulfite hangover the next day. <a href="http://cleanwine.info">You can read more about it here</a>, but the gist is that the yeast produces histamines to protect themselves when they encounter toxins in the fermentation process. We make sure the yeast only find what their looking for when doing their job in the fermentation tank by feeding them a healthy diet, sorting our grape three times to ensure only beautiful fruit is present, and by maintaining rigorous sanitation procedures.</p>
<p>We have our own water treatment facility &nbsp;we recycle 98% of all water that we use. <a class="tip4" title="Episode 22 (Part 1) - Water Conservation" href="http://www.youtube.com/watch?v=fyXD4N2EsgI&amp;fs=1">You take a tour of the facility with the winemaker on Cellar Rat TV</a>. In conjunction with our own well, we&rsquo;ve created a model for what a sustainable winery can be. We recently added a state-of-the-art ultra violet light sanitation system that completely sterilizes all of the water at Deerfield without the need to use any chemicals. The system passes the water through three ultra violet light chambers that irradiate the water in a continuous flow with ultra-violet light (trust me, NOT a bad thing) so that no microbes come out the other end. We&rsquo;re thrilled to add this to the winery because it guarantees us that the water we use in the winemaking process is completely pure.</p>
<p>Making clean wine isn&rsquo;t just about one thing though. It requires a concentrated and thoughtful effort at every stage of the winemaking process, from the vineyard to the bottling truck. It&rsquo;s worth the effort though. I personally am terribly affected by sulfites in wine. We use sensitive equipment to gauge exactly how much oxygen is dissolved in the wine and then add only enough SO2 to seek out and bond with the oxygen, leaving behind only inert SO3. Often when our wines are first release the SO2 is lower than 10 parts per million which is below the human threshold. That number even decreases as the wines age. For those people (like the winemaker&rsquo;s wife, PJ) who suffer from headaches that make drinking red wine an awful prospect, Deerfield offers a delicious revelation. If you are one of those people, go ahead, try a glass of Deerfield! You won&rsquo;t be the first person to discover that you can enjoy red wine again.</p>
<p>﻿</p>]]></content></entry><entry><title>Adapting To The Elements</title><id>http://deerfieldcellarrat.com/cellar-rat-blog/2011/6/2/adapting-to-the-elements.html</id><link rel="alternate" type="text/html" href="http://deerfieldcellarrat.com/cellar-rat-blog/2011/6/2/adapting-to-the-elements.html"/><author><name>The Cellar Rat</name></author><published>2011-06-02T23:27:42Z</published><updated>2011-06-02T23:27:42Z</updated><content type="html" xml:lang="en-US"><![CDATA[<p>We  can&rsquo;t control Nature but we can learn from it. The last couple years  have posed some real challenges for Northern Californian farmers,  especially those who grow wine grapes. The extremely cool growing  seasons of the past two vintages made it difficult to fully ripen the  fruit before the potentially damaging fall rains came down. I wrote in  more detail about <a href="http://deerfieldcellarrat.com/cellar-rat-blog/2010/3/4/slightly-cloudy-with-a-chance-of-mold.html">the difficulties we faced in 2009 and 2010</a> and I&rsquo;ll summarize by saying that coupled with the early onset and  unusual heaviness of the rain, the seasons created a difficult choice  for farmers: Either harvest the grapes before they are fully ripened to  avoid the mold issues and dilution of the fruit that the rain could  bring, or hope that the rain is brief so the ground dries and the grapes  finish maturing. We like to say that these are winemaker&rsquo;s years, when  the great winemakers stand out. At Deerfield, we approached the vintage  by making wines like those from regions of the world that never get too  warm, like Bordeaux and Mosel Valley, and sorted our fruit even more  meticulously than usual, <a href="http://deerfieldcellarrat.com/cellar-rat-blog/2010/3/18/second-protocol.html">sorting out moldy grapes caused by the rain</a>.  For a skilled winemaker, <a href="http://deerfieldcellarrat.com/cellar-rat-blog/2010/7/8/the-myth-of-the-bad-vintage.html">there need not be a bad vintage</a> and &rsquo;09 and &rsquo;10 is proof of that, with outstanding wines like our <a href="http://rexfamilywineries.com/xe/xe.asp?page=viewitem&amp;p=09CHARDLC&amp;cat=chardonnay">2009 Los Chamizal Chardonnay</a>.</p>
<p><br />Well,  we&rsquo;re having another unusually cool spring and it doesn&rsquo;t yet have the  appearance of warming up, with the weather forecasting another week of  rain for the beginning of June. The farmers of wine grapes in Sonoma  County are quick to adapt however, seeing a recurring pattern. Last year  in an attempt to help ripen the grapes almost everyone in the Sonoma  Valley dropped some of their fruit from the vine, meaning they cut off  bunches of grapes that were good, curtailing the yield of each plant and  thereby channeling the vines&rsquo; nutrients and energy into the remaining  clusters. This year, some farmers I&rsquo;ve spoken to, like Dan Sanchez of  Alpicella Vineyard, where we get our amazing Sangiovese grapes, say  they&rsquo;re taking a more proactive approach by removing formative grape  clusters and reducing the yield before they even begin to flower. That  way the remaining bunches get the attention of the vine from the very  beginning.</p>
<p><br />The  current weather is helping growers make informed decisions about how to  approach the upcoming vintage. It also has more immediate impacts. <a class="tip4" title="Episode 18 - Weather And Vines" href="http://www.youtube.com/watch?v=rLLEJXZDppA&amp;fs=1">In this episode of Cellar Rat TV</a> produced before the last harvest, I talked about how our vines were  fortunately protected from the late spring rains. People often ask what  the effect all this rain is having on the vines. Water always means that  you could have a mold or mildew problem, which you can treat  organically by spraying the vines with sulfur. The more serious threat  is that the rain can damage the fruit set by hurting the nascent  flowers, either destroying them or washing away the pollen. The result  is loose bunches where only a few of the flowers were able to become  grapes, potentially diminishing the crop&rsquo;s yield. On the positive side,  the increased rain means the water is going deeper into the soil and  lasting longer. This causes greater and deeper root growth, which will  produce a more vigorous vine the following year and therefore a bigger  crop.</p>
<p><br />The  wine-growing region of Northern California has incredibly diverse  climates, even in small geographical areas. While the rains might have  affected some of our neighbors in the Sonoma Valley where it is a little  warmer and the budding out therefore earlier, our vines are always a  bit behind in the growth cycle, probably due to the Kenwood Marsh  keeping the ground cool (I&rsquo;ve noticed the closer to the pond you get,  the less developed the vines are). Our vines haven&rsquo;t yet flowered and  the bunches are still protected by the little green pods called the calyptra,  so I don&rsquo;t expect the rain will have any other impact other than to  make our vines grow vigorously throughout summer and perhaps provide a  bigger crop next year. Since the spring was cool and wet, we look forward to a long warm summer and <strong>late</strong> fall rains.</p>]]></content></entry><entry><title>The Composer's 5th Symphony</title><category term="blending"/><category term="tasting"/><category term="winemaking"/><id>http://deerfieldcellarrat.com/cellar-rat-blog/2011/5/26/the-composers-5th-symphony.html</id><link rel="alternate" type="text/html" href="http://deerfieldcellarrat.com/cellar-rat-blog/2011/5/26/the-composers-5th-symphony.html"/><author><name>The Cellar Rat</name></author><published>2011-05-26T23:46:05Z</published><updated>2011-05-26T23:46:05Z</updated><content type="html" xml:lang="en-US"><![CDATA[<p><a href="http://deerfieldcellarrat.com/cellar-rat-blog/2011/5/2/the-tasting-experience.html">I&rsquo;ve often talked about how winemaking is the meeting ground between art and science</a>, how chemistry aids us in our understanding of the craft but at the end of the day it&rsquo;s all about taste. Yesterday I had the pleasure of joining Winemaker Robert Rex and the Custom Crush Winemaker Cecilia Valdivia as they sat down to begin formulating the blend for the 2007 vintage of <a href="https://www.rexfamilywineries.com/xe/xe.asp?page=viewitem&amp;p=06RedRex&amp;cat=blends">Deerfield&rsquo;s immensely popular Red Rex</a>. For those of you not familiar with this particular wine, I&rsquo;ll summarize by saying it is a mega-blend, the likes of which would only be produced in California because it breaks all the rules. <a href="http://deerfieldcellarrat.com/cellar-rat-blog/2010/7/8/the-myth-of-the-bad-vintage.html">In this blog I wrote about how unlike Coca Cola, two vintages are never the same</a>. For this reason Robert never follows a set formula, he simply seeks to make the best possible wine from the grapes Mother Nature deigned to give us. And so the character of the wine can change dramatically though the goal remains the same: To produce a complex, approachable, full-bodied wine that covers every inch of your palate. This year&rsquo;s Red Rex is a fascinating blend produced from 7 varietals, 17 vineyards, and no less than 25 different lots (individual batches of wine). While this may seem like an &ldquo;everything-but-the-kitchen-sink&rdquo; blend, in fact the exact opposite is true: Each component was carefully considered and selected because it will add a specific desirable feature to the finished wine.</p>
<p>So where does a winemaker start? Well of course, it starts in the vineyard. All of the grapes from the different vineyard produced separately as their own wines. As these wines are made, the winemaker becomes intimately familiar with each of them. So on paper, Robert first begins to plan out which wines he thinks ought to be included in the blend and in what amounts. A Cellar Rat has a busy day carefully pulling samples from all 25 different lots. Then a representative blend of all the wines is made. Next comes the fun part &ndash; we tasted through every single lot of wine so Robert could reassess each component of the blend individually. The only way to improve your palate is by practice and yesterday I felt as though my palate had a crash course that would normally have taken months or years. Tasting each wine and comparing and contrasting them with the others really allows you to see how each one is different and learn what your likes and dislikes are. Also certain factors alter your perception so having a winemaker there to explain what you&rsquo;re experiencing is invaluable. For example, higher acidity can create the impression of high alcohol when in fact that is not the case. Having the lab results of the actual amounts of acids, alcohol, pH balance and residual sugar is helpful too because it allows you to understand the correlation between the various components.</p>
<p>After every instrument was individually experienced, we next listened to the whole concerto. It was incredible how it was possible to detect and pick out the individual characteristics of the different wines we had tasted earlier even though they were present in such miniscule amounts. Now that the winemaker has a better idea of the wines and how they harmonize, Robert will tweak the ratios of the blend and come back for round two with his adjustments. This time instead of tasting every component we will taste several different versions of the blend to fine tune the orchestra and find the one that works best. I expect that the 2007 Red Rex will receive a standing ovation when the house lights come up.</p>]]></content></entry><entry><title>Gotcha Sucker!</title><category term="trellising"/><category term="vines"/><category term="viticulture"/><id>http://deerfieldcellarrat.com/cellar-rat-blog/2011/5/11/gotcha-sucker.html</id><link rel="alternate" type="text/html" href="http://deerfieldcellarrat.com/cellar-rat-blog/2011/5/11/gotcha-sucker.html"/><author><name>The Cellar Rat</name></author><published>2011-05-11T22:01:46Z</published><updated>2011-05-11T22:01:46Z</updated><content type="html" xml:lang="en-US"><![CDATA[<p>It&rsquo;s spring time in the valley and the vines everywhere have erupted. The heat hasn&rsquo;t yet begun to brown the grasses so the hills are rolling shades of green. In every vineyard an important job is being done now that the vines have sprouted shoots. There are many different trellising techniques and I&rsquo;ve talked about a few of them employed in the area in this post, as well as different philosophies of how to best manage vines. All these different systems share the same goal, however, which is to channel as much of the vine&rsquo;s energy and nutrients as possible to the development of the fruit that we use to make into wine. The winegrower&rsquo;s&nbsp; job is to coax the vine into only producing structures that directly assist in helping form intensely flavored, delicious grapes &ndash; everything else the vine tries to produce should be removed.</p>
<p><span class="full-image-block ssNonEditable"><span><img style="width: 375px;" src="http://deerfieldcellarrat.com/storage/post-images/suckering.jpg?__SQUARESPACE_CACHEVERSION=1305151499349" alt="" /></span></span></p>
<p>Deerfield&rsquo;s vineyards use the double cordon training system that is commonly employed in California. In this system the vertical vine is split into two horizontally trained arms called &ldquo;cordons&rdquo;. Each cordon is then pruned every year so that it has four growth nodes called &ldquo;spurs&rdquo;. The vine is trimmed back to this state every year and these parts lignify (become wooden) and grow thicker with each passing year. Every year new shoots called &ldquo;canes&rdquo; sprout from the spurs and it is these green shoots that bear the fruit. Each cane is supposed to bear only one or two bunches of grapes.</p>
<p>No matter how your vines are trained they will always sprout some shoots in the wrong places. If left unchecked these shoots will suck up valuable resources and may even try to produce some unproductive grapes of their own. These &ldquo;suckers&rdquo; need to be removed as soon as possible, before the vine starts producing the buds that will become the clusters of grapes. Vineyard crews spend much of spring visiting each vine and making sure it&rsquo;s behaving properly by snapping off extra shoots or sometimes shoots that just aren&rsquo;t where they&rsquo;re supposed to be. At the end of the day, for vineyards using the double cordon system, each vine should have just 16 new canes growing. It&rsquo;s a much easier job then pruning in the winter because the young shoots can just be snapped off easily by hand, as opposed to when they become partially lignified and need to be clipped with powerful shears.</p>
<p>I&rsquo;ve been paying close attention to one vine in particular this year, watching its growth and documenting it. I take great pleasure in watching it progress a little more each day. The rate of growth is truly fantastic. Yesterday the buds that would become grape clusters were barely perceivable and today they&rsquo;ve burst into the tiny <em>calyptra</em> that will blossom into the flowers. The shoots grow almost an inch daily! Of course the real excitement begins when the grapes start to ripen&hellip;</p>
<p>﻿</p>]]></content></entry><entry><title>The Tasting Experience</title><category term="love of wine"/><category term="tasting"/><id>http://deerfieldcellarrat.com/cellar-rat-blog/2011/5/2/the-tasting-experience.html</id><link rel="alternate" type="text/html" href="http://deerfieldcellarrat.com/cellar-rat-blog/2011/5/2/the-tasting-experience.html"/><author><name>The Cellar Rat</name></author><published>2011-05-02T23:34:33Z</published><updated>2011-05-02T23:34:33Z</updated><content type="html" xml:lang="en-US"><![CDATA[<p>I&rsquo;ve written before about how winemaking is the convergence between art and science, equal parts cooking and chemistry. Our taste bud&rsquo;s receptor cells bond momentarily with the specific and identifiable chemical structure of the liquid, but in that instant the sensation of those neurons firing in our brain is translated into our conscious perception of the taste of the wine something transcendent occurs. That perception is inherently subjective and it is then, when the science is elevated to the status of art. In that moment, too, the nuances of the wine drinking experience become blended, like Red Rex, with neurons triggered by all manner of other sensory input from our surroundings: Our perception of wine is intrinsically related to circumstances in which it is enjoyed.</p>
<p>A wine enthusiast knows that their palate is easily influenced by wines enjoyed earlier in the night that are still lingering on the tongue. It helps tremendously to chew on a piece of bread to clear your palate. If you&rsquo;ve ever seen a jar of coffee beans in a tasting room and wondered what the story was, it&rsquo;s a similar idea. You just sniff the beans to clear out the sinuses. It actually works amazingly well! In the same way that food usually tastes a bit strange right after you brush your teeth, that garlicky Caesar salad has the same effect of the subtleties of wine, though you may not necessarily realize it.</p>
<p>Yet beyond muddling different foods and wines that may cloud our palate&rsquo;s perception, which is perhaps a more conspicuous effect, there also is the ambiguous influence of present moment: What mood you are in when you taste the wine; the setting in which it is enjoyed; the company that you share the experience with. Subconsciously, all of these factors impact the verdict. &nbsp;It&rsquo;s true that wine changes dramatically over time, and that individual bottles of wine can vary. Next time you have an experience where you tried a wine once and didn&rsquo;t like it, yet on another occasion reversed your stance, consider that perhaps it wasn&rsquo;t the wine that changed, but it was you.</p>
<p>When we created our tasting room in Deerfield&rsquo;s cave we understood that the atmosphere of the room itself is intrinsically related to the wine drinking experience. Instead of a long wine bar where you stand shoulder to shoulder with other guests, we created an open and inviting space with deep couches and comfy chairs, arranged in a way that you can enjoy the company of your friends. The people you share your experience with are equally important, and that&rsquo;s why we have a staff that is friendly and knowledgeable, because while wine is a truly fascinating topic of conversation, it&rsquo;s mainly about having fun!</p>]]></content></entry></feed>